If you want to create High Dynamic Range (HDR) images, but you don’t like the surreal or exaggerated look, this tutorial is for you. I’ll show you how to quickly create realistic HDR in Photoshop with custom tone-mapping - you'll be blown away at how easy it is!
What Is Dynamic Range?
I’m gonna start by explaining some of the concepts behind HDR Photography. If you know all about it and just want to learn how to do it realistically in Photoshop, skip to the tutorial section.
Put simply, dynamic range (DR) is the difference between the largest and smallest value for a given property. In audio, the DR is the ratio between the loudest and quietest segments. In digital photography, the dynamic range is the spread between the brightest pixel and the darkest pixel in an image.
The term “HDR Photography” is misleading, because it implies that you can magically create a bigger ratio of light to dark in your images, when in fact the dynamic range is set by the medium in which you’re viewing the image. On a print, it’s the whiteness of the paper vs. the darkness of the fully exposed silver. In pixels, you only get as much range as your monitor can display. This is why we have tone-mapping (but we’ll get into that later).
In actuality, the thing that has high dynamic range is the scene that the image depicts. For example, a sandy beach on an overcast day has a relatively low DR. The ratio between the brightest highlight and the darkest shadow is made smaller by the big, soft, even light in the sky. The same scene on a sunny, cloudless day will have a whopping great-big DR. You don’t have to be a pro-shooter to know the brightest areas will be blown out and/or the shadows will be black with no detail. Why? The camera lacks the ability to capture such a large range of brightness-to-darkness values in one photograph.
Without going into the science behind why that is, let’s move on to what we can do about it as photographers.
HDR Photography and Tone-Mapping
If you’re familiar with HDR Photography at all, you’ll know that it’s produced when multiple photos of the same scene are shot at different exposures, and then blended together to render a larger range of brightness-to-darkness values. In our sunny day example, we’d use a fast shutter to properly expose the bright sand in one photo, and then a slow shutter to expose the shadows. At this point, most photographers load these source files into HDR software. But then, the first step in the HDR process produces an unusable image. Why?
Remember that the maximum dynamic range of a digital photo is that of the monitor it’s being viewed on - but the HDR image exceeds the DR of the monitor! In other words, the digital information in the blended HDR image is distributed over a larger range - a higher dynamic range - than the monitor is able to display.
So the next step is Tone-Mapping. With some minimal guidance from you, the HDR software decides what portions of each source file to use in the final blended image, and puts it into a range that monitors can display and printers can print.
The problem with all of this, is that software-generated Tone-Mapping is characteristically “surreal” - the exaggerated local contrast makes the photo more painterly and less than realistic. Many people enjoy these types of images because of that quality, which is why HDR Photography is so popular. But what if you want to capture scenes with high dynamic range in a photo-realistic way? What if your images are headed for some practical or commercial application where realism is an absolute requirement?
This can be achieved with some in-depth tweaking of HDR software, but there’s an easier and better way, and it utilizes a software tool that most photographers already have - Photoshop. I’m not talking about the “Merge to HDR Pro...” function either...
Let the Realistic HDR Begin...
For the example in this tutorial, I’m going to address a very commonplace situation in which HDR is useful: interior architectural photography. Anytime you have a window in the shot, bright daylight streams through it, and you either get a blown-out window or an under-exposed interior. Also, most commercial applications for interior photography require absolute realism - funky HDR effects are not gonna get your photo into Architectural Digest, or even a Realtor magazine, for that matter.
I'm assuming you know to shoot on a tripod so each of your exposures has the same composition. You can download the files from this post or use your own to follow along.
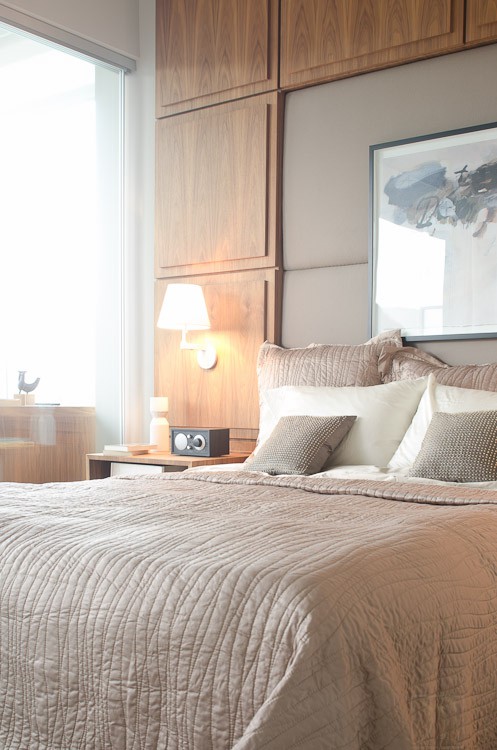
This example of a metered exposure has both a blown out window and underexposed shadows. There’s other shortcomings with the shot, but for the sake of this tutorial, let’s just use it as an example for HDR processing.
Here are two bracketed exposures, one for the highlights and one for the shadows.
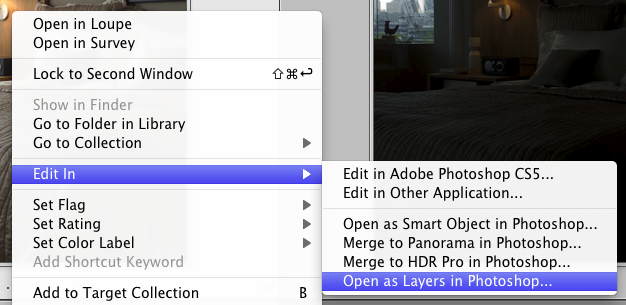
If you're using Lightroom, select all three, then Right-Click » Edit In » Open As Layers In Photoshop...
You can also select the files in the Mac Finder or Windows and open them in Photoshop. If you're shooting RAW (and why wouldn't you be) they'll open in Camera Raw. Select All images and click "Open Image". They will start as separate Photoshop documents, but just move them all into the same document (move tool, or copy & paste, etc) as separate layers.
Now you have 3 layers on top of one another. Make sure the metered exposure (the "medium" one) is at the bottom. I have mine in this order:

With the top layer selected, click on the "Add layer mask" button at the bottom of the panel. You should then have a new layer mask filled with white, which means "Show All". If you need some more info on how layer masks work, check out this post on Photoshop Layer Masks.

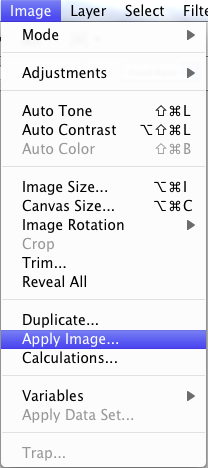
With the layer mask selected, go to Menu » Image » Apply Image...

In the Apply Image pop-up, under the "Source" section, make sure that the Layer selected is the one you're working on. Use the other settings as shown in the screenshot and hit "Okay".

What you've done here is created a mask out of the luminance values of the image itself - you "applied" the image to it's own mask.

Because this shot was exposed for the highlights, the blown-out window has high luminance values and becomes a white area in the mask. The shadows on the other hand, are underexposed. They are applied as black in the mask and therefore are hidden on the layer. The result is a layer with just the highlight information showing. On a black background it looks like this:
Repeat the same steps for the 2nd layer - the over-exposed one - except this time, in the Apply Image pop-up, check the "Invert" option:

Now you have an image with only shadow information. On a black background it looks like this:
Remove the black background, and with all three layers visible, stacked on top of one another, this is what we get:
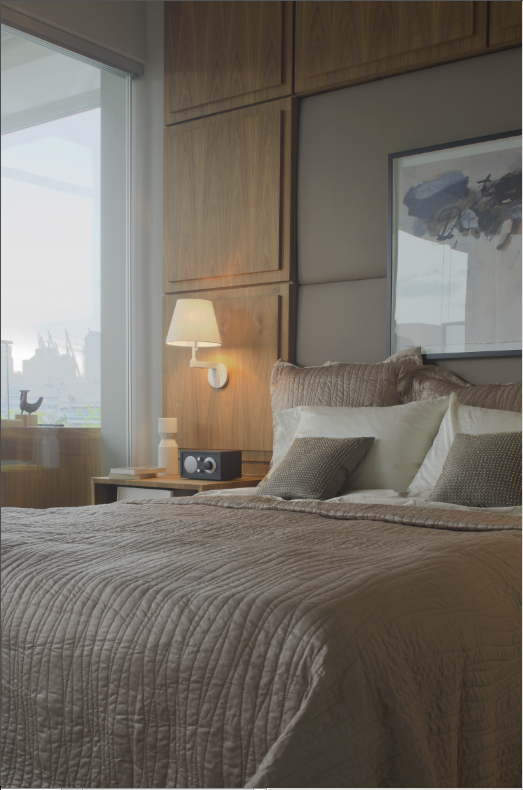
Compared with the original we already have significantly more detail in the highlight and shadow areas, and we only made a few mouse clicks so far. The best thing about this technique, is that now you have all the tools of Photoshop at your disposal to create your own custom tone-map!
Select the layer masks and adjust them with "Levels". Paint the layer masks manually with brushes if you want, or adjust their density and other characteristics in the "Masks" panel. If you go too far, editing a mask is non-destructive so you can delete the mask and create a new one with a few mouse clicks (as we've just learnt). Or if you like the look that your mask produces but want to tone it down a bit, just change the opacity on that layer. It's so easy to have granular control over your HDR images, I don't know why anyone would use HDR software.
For this example, I brought it back into Lightroom, made my standard adjustments (bit of exposure tweaking, increased saturation a bit, sharpened a bit) and THAT'S IT!
I hope you find this Realistic HDR tutorial beneficial. Why don't you let us know about your HDR workflow in the comments section? Or if you've had a chance to experiment with the technique in this post, I'd love to hear your results, challenges, & wins ;)


